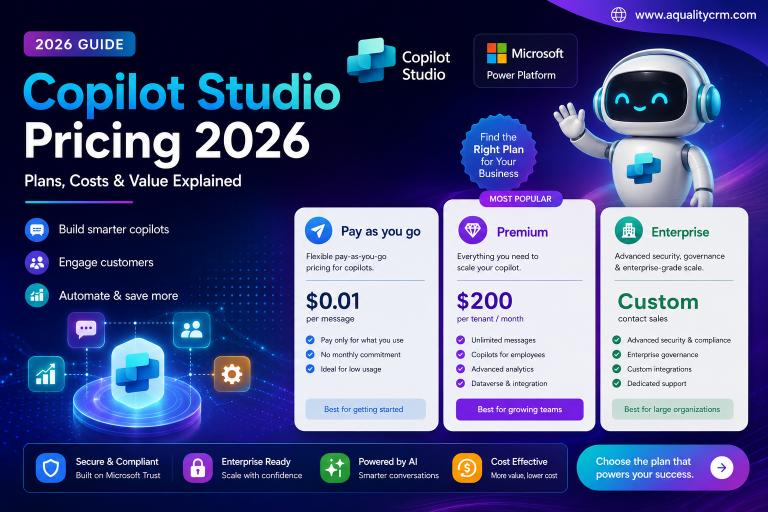
A custom action in Copilot Studio is how you connect an agent to a system Microsoft hasn’t already built a connector for: your own order database, an internal pricing API, a legacy ERP endpoint, anything reachable over HTTP. There are two ways to build one: wrap the call in a Power Automate flow, or register it as a custom connector and add it directly as a connector action. Most teams reach for a flow first because it’s faster to get working, then move frequently-reused calls into a custom connector once the integration proves itself. Both paths consume Copilot Studio messages, so it is worth reading what Copilot Studio agents actually cost in 2026 before you design around either.
This guide covers both paths end to end: when to use which, how authentication actually works, how to design inputs and outputs the agent can use correctly, and the failure modes that catch teams out in testing. If you haven’t built a Copilot Studio agent at all yet, start with our guide to building your first AI agent without writing code and come back here once you need it to do more than answer questions from a knowledge source.
What Are Custom Actions, and When Do You Need One?
Copilot Studio ships with over a thousand prebuilt connectors for Microsoft 365, Dynamics 365, SharePoint, and popular third-party services. A custom action is what you build when the system you need isn’t on that list, or when the prebuilt connector exposes the wrong operations for what the agent needs to do. In practice that means: internal line-of-business systems, older on-premises applications reachable through a gateway, niche industry software, or an API your own development team owns.
A useful test before you build one: can the agent already do this with a standard connector and a bit of topic logic? If yes, use that, it’s less to maintain. If the answer involves “we’d need to call our own API for that,” you need a custom action.
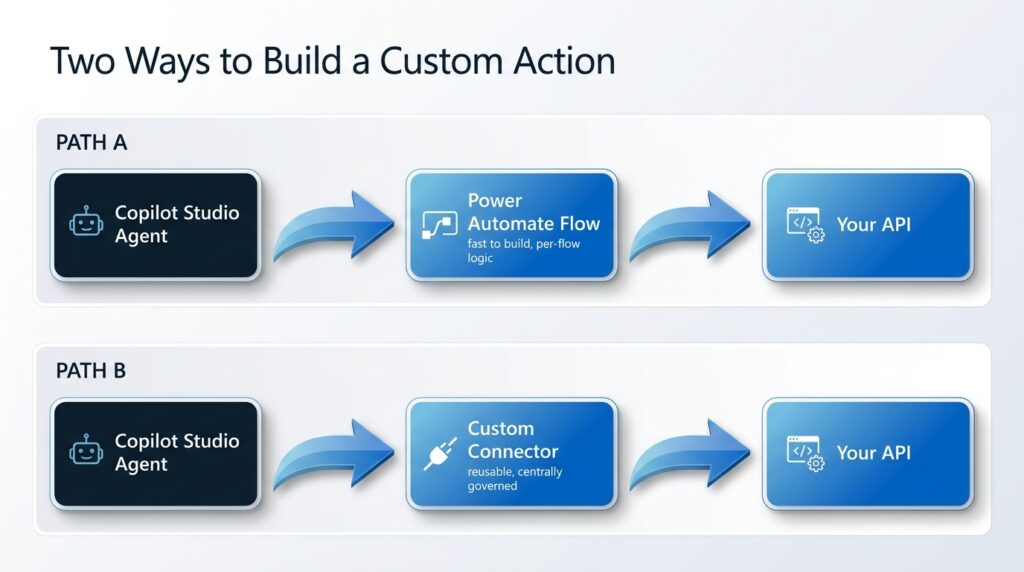
Two Ways to Build a Custom Action
Both paths end with the agent able to call your API mid-conversation and use the response. They differ in where the integration logic lives and how reusable it is.
| Factor | Power Automate flow | Custom connector |
|---|---|---|
| Speed to build | Fast, minutes to an hour for a simple call | Slower, needs an OpenAPI definition or manual setup |
| Best for | One-off calls, multi-step logic, calls that combine several systems | A clean single API reused across many flows, apps, and agents |
| Where logic lives | Inside the flow: transforms, conditions, error handling | Mostly in your API itself; the connector is a thin, governed wrapper |
| Governance | Per-flow; each maker builds and owns their own flow | Centralised; one connector definition, versioned and shared |
| Reuse | Copy the flow or rebuild for each new agent | Add the same connector to any number of agents, flows, or apps |
A common pattern we use with clients: prototype the integration as a flow first, because you can see and adjust every step. Once it’s proven and other makers want the same capability, promote it to a custom connector so it’s maintained in one place instead of copy-pasted across five flows.
Building a Custom Action with a Power Automate Flow
In Copilot Studio, actions built from flows use Power Automate cloud flows that start with an instant trigger and are marked available to Copilot Studio. The steps:
- In your agent, go to Actions and choose to add a new action, then create a new flow (or open Power Automate directly and start one from the Copilot Studio-triggered template).
- Define the flow’s inputs. These become the parameters the agent fills in from the conversation, for example an order number or a customer email address. Name them clearly; the agent’s language model uses these names and descriptions to decide what to ask the user for.
- Add the action that calls your system: an HTTP action against your API, a connector step if one already exists for that system, or a database query. This is where authentication to the target system happens.
- Shape the response. Parse the JSON your API returns and set clear, well-named outputs, rather than passing back a raw response blob. The agent works far better with “OrderStatus: Shipped” than with an unparsed payload.
- Save and return to Copilot Studio. The flow now appears as an action you can add to any topic, with its inputs and outputs available to reference.
Keep the flow focused on one job. A flow that looks up an order and also updates a spreadsheet and also sends an email is harder to debug and reuse than three flows that each do one thing well. Our guide to Power Automate best practices covers this in more depth for flows generally, and it applies directly to flows built as Copilot Studio actions.
Building a Custom Action with a Custom Connector
A custom connector is a formal, reusable definition of your API inside the Power Platform, built from an OpenAPI (Swagger) definition, a Postman collection, or defined manually operation by operation. Once created, it behaves like any of the thousand-plus standard connectors: it appears in the connector picker, can be added directly as a Copilot Studio action, and can be used in Power Automate and Power Apps too.
- In the Power Platform admin centre or maker portal, create a new custom connector. If your API already has an OpenAPI spec, import it directly; this saves most of the manual work.
- Define or confirm the operations you need: the endpoint, HTTP verb, path and query parameters, and the request body schema. Give each operation a clear summary, this text is what shows up when someone adds it as an action.
- Configure authentication for the connector (covered in the next section) and define the response schema so consumers get typed, named fields back instead of raw JSON.
- Test the connector directly in the wizard before using it anywhere. This catches schema mistakes before they show up as confusing errors inside an agent conversation.
- In Copilot Studio, add the connector’s operation as an action on your topic, the same way you’d add any standard connector action.
Custom connectors live at the environment level and can be shared across your organisation, which makes them the right choice once more than one team wants to call the same API. They also version cleanly: update the connector definition once, and every agent, flow, and app using it picks up the change.
Designing Inputs and Outputs the Agent Can Actually Use
This is the part that separates actions that work reliably from ones that produce vague or wrong answers. The agent’s language model decides when to call an action and how to fill its parameters based entirely on the names and descriptions you give them, not on your API’s internal field names.
- Name inputs the way a person would describe them. “OrderNumber” with a description like “the customer’s order number, usually starting with a letter” works far better than a bare field named “id”.
- Mark inputs as required only when the API genuinely needs them. Optional parameters the agent doesn’t have to chase down keep conversations shorter.
- Return structured, named outputs, not a single blob. Break the response into fields like OrderStatus, EstimatedDelivery, and TrackingNumber so the agent can reference exactly what it needs in its reply, and so you can reuse individual fields in later steps of the topic.
- Keep responses small. If your API can return a filtered or summarised result, do that in the flow or connector rather than handing the model a large payload to sort through.
Test each action with a handful of oddly-phrased real requests, not just the clean example you designed it for. If testers consistently give an order number in a format your action doesn’t expect, that’s a schema or description problem to fix, not a training problem.
Which Authentication Option Should You Use?
Both flows and custom connectors need to authenticate to your target API. The right choice depends on what your API supports and who the caller is.
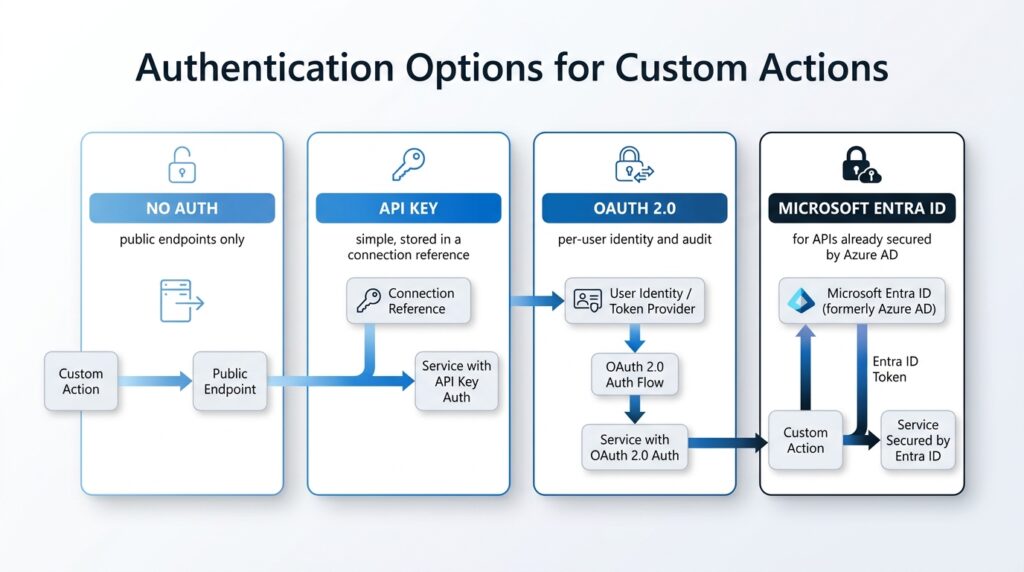
- No authentication. Fine for genuinely public, non-sensitive endpoints. Rare in a business context; treat this as a temporary state during early testing, not a production choice.
- API key. Simple and common for internal APIs. Store the key as a secure input on the connector or in a Power Automate connection reference, never hard-coded in the flow itself, so it can be rotated without rebuilding anything.
- OAuth 2.0. The right choice when the API needs to know which user or service is calling it, not just that a valid key was presented. Needs an app registration with the identity provider and a defined redirect URL, more setup, but far better audit and access control.
- Microsoft Entra ID (Azure AD). The natural choice when your API is itself protected behind Entra ID, which is common for internal .NET or Azure-hosted APIs in a Microsoft shop. Lets you use existing app registrations and service principals instead of managing a separate secret.
Whichever option you choose, connection credentials belong to a connection reference, not to individual makers’ personal accounts. When a maker leaves or a password rotates, you want to update one connection, not track down every flow and agent that used a personal login.
Testing, Debugging, and Common Failure Modes
Use the test pane in Copilot Studio to trigger the action directly and inspect exactly what was sent and returned, rather than debugging blind through conversation. A handful of failure patterns show up repeatedly:
- The agent never calls the action. Usually a naming or description problem: the action’s purpose isn’t clear enough for the model to recognise when it applies. Rewrite the description in plain language describing exactly what it does and when to use it.
- The action is called with the wrong or missing parameters. Check the input descriptions and examples. Adding a short example value often fixes this faster than rewording the description again.
- Timeouts on slow APIs. Copilot Studio actions have response time limits. If your API is genuinely slow, consider having the flow kick off the work and respond with a status the agent can relay, rather than making the whole conversation wait.
- Silent failures on error responses. Make sure your flow or connector handles non-200 responses explicitly and returns something the agent can act on, such as “order not found,” instead of letting an unhandled error surface as a generic failure to the customer.
- Rate limiting under real traffic. An action that works fine in testing with one user can hit API rate limits once a channel goes live. Check your target API’s limits before launch, not after.
A Worked Example: Order Status Lookup
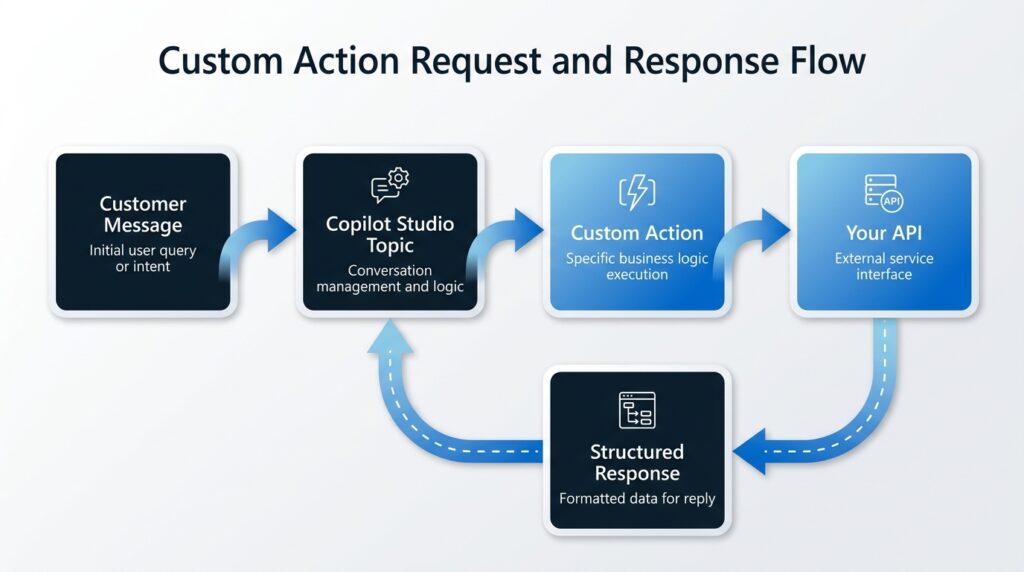
Here’s how the pieces fit together for a common request: a customer asks a support agent “where’s my order?”
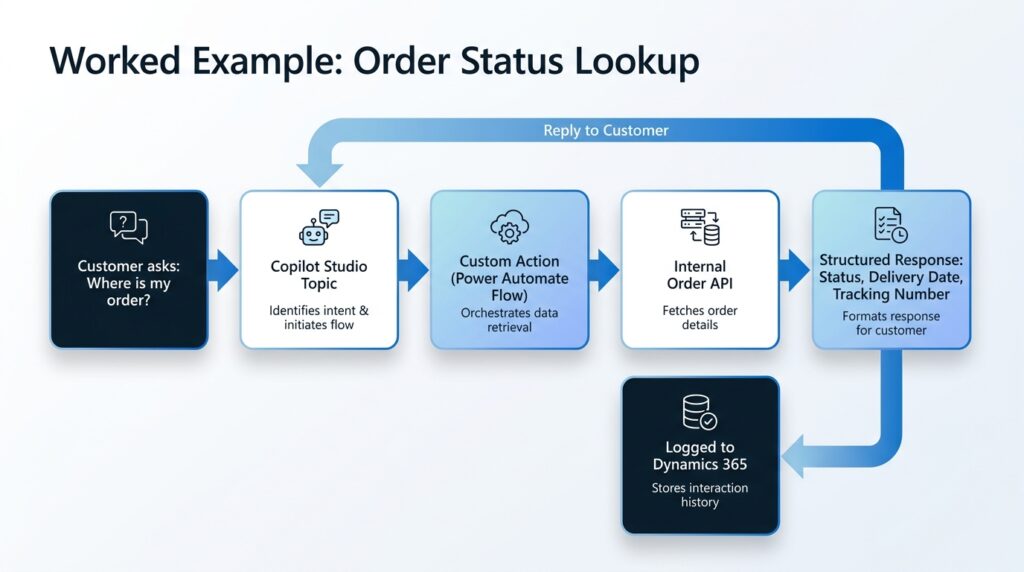
The topic recognises the intent and asks for an order number if one wasn’t given. A custom action, built as a Power Automate flow in this case, takes that order number as input, calls the internal order management API over HTTPS with an API key stored in a connection reference, and receives a JSON response. The flow parses that response into three clean outputs: OrderStatus, EstimatedDelivery, and TrackingNumber. The topic then uses those outputs directly in its reply, and can optionally log the interaction back to Dynamics 365 as an activity on the customer’s record so the next agent, human or otherwise, has context. If the order isn’t found, the flow returns a specific “not found” output rather than an error, and the topic handles that case with its own message rather than a generic failure.
This same pattern, action takes structured input, calls a system, returns structured output, topic reacts to that output, is the backbone of almost every useful custom action regardless of what system sits behind it.
Frequently Asked Questions
Can a custom action call an on-premises system?
Yes, through the on-premises data gateway. Install the gateway inside your network, register the connection in Power Platform, and both flows and custom connectors can reach systems that aren’t exposed to the public internet, such as an internal database or a legacy application server.
Do custom actions work with generative orchestration, or only classic topics?
Both. Under generative orchestration, the model decides when to call an action based on its name and description rather than a topic explicitly triggering it, which makes writing clear, specific action descriptions even more important than under classic topic-triggered actions.
How many custom actions can one agent have?
There’s no small fixed limit, but practically, agents with dozens of loosely-described actions become harder for the model to pick correctly between and harder for you to maintain. Group related actions logically and write distinct, specific descriptions rather than adding every possible API call to a single agent.
Should developers or citizen makers build custom actions?
Simple flow-based actions calling an already-friendly API are well within reach for a capable citizen maker. Custom connectors with OpenAPI definitions, complex authentication, and error handling for a messy internal API benefit from developer involvement, at least for the first version. A common split we use with clients: developers build and document the connector, makers assemble it into agent conversations.
Next Steps
Start with the one API call that would remove the most manual work from your team’s day, build it as a Power Automate action first, and prove it in testing before deciding whether it earns a custom connector. If you’d like help designing the integration or securing it properly, AqualityCRM builds Copilot Studio agents and the custom actions behind them, and we’re glad to review your architecture before you build.
Building an Agent That Needs to Talk to Your Systems?
AqualityCRM designs and builds Copilot Studio agents, including the custom actions and API integrations behind them. Book a free consultation and talk through your architecture.